How to Use Claude Code: A Complete Beginner's Guide (2026)
Everything you need to go from zero to writing real code with AI — no prior experience required.
1. What is Claude Code?
Claude Code is Anthropic's AI coding assistant that lives inside your terminal. Unlike tools like ChatGPT — where you paste code back and forth — Claude Code reads your entire project directly, edits files, runs commands, and can even handle Git operations for you. All through plain English.
Think of it like having a senior developer sitting next to you, who never gets tired, never loses track of your code, and can hold your entire codebase in memory at once. You just describe what you want — and Claude figures out how to do it.
- Terminal-native — Works directly in your files — no copy-pasting required.
- Multi-file editing — Changes across many files in one go, intelligently.
- Git-aware — Creates commits, branches, and pull requests for you.
- Huge context — Holds up to 1 million tokens — entire codebases fit.
2. What you need before you start
Don't worry — the list is short:
- A Claude subscription. The Pro plan at $20/month is enough for beginners. It resets every 5 hours, so you won't get cut off mid-project.
- A computer running macOS, Linux, or Windows 11. All three are fully supported. On Windows, use PowerShell (not Git Bash).
- A terminal app. Terminal on Mac, PowerShell on Windows, or any major terminal on Linux — already installed on your machine.
- Git (optional but strongly recommended). It lets you review and roll back changes Claude makes. A safety net you'll be glad to have.
3. How to install Claude Code
There are two ways to get started — pick whichever feels more comfortable.
Option A: Terminal (recommended)
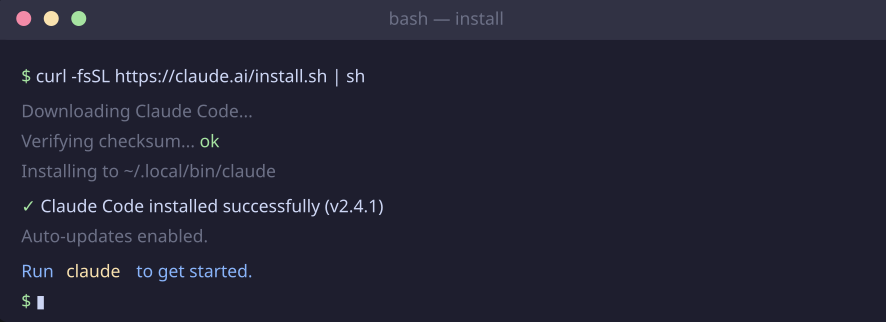
Open your terminal and run the official installer from Anthropic's site. On macOS/Linux:
curl -fsSL https://claude.ai/install.sh | shOn Windows (in PowerShell):
iwr https://claude.ai/install.ps1 | iexThis auto-updates in the background — no manual upgrades needed.
Option B: Desktop app
Prefer a visual interface? Download the Claude Code Desktop app from anthropic.com/download. Available for macOS and Windows. Sign in, open the Code tab, and you're ready.
Tip: You can also install via Homebrew on Mac (
brew install claude-code) or as extensions for VS Code and JetBrains if you prefer working inside your editor.
4. Your first session
Once installed, open your terminal, navigate to any project folder, and just type:
claudeThat's it. Claude will read your project structure, figure out your tech stack, and wait for your first message. On first launch, it will ask you to log in with your Claude account.
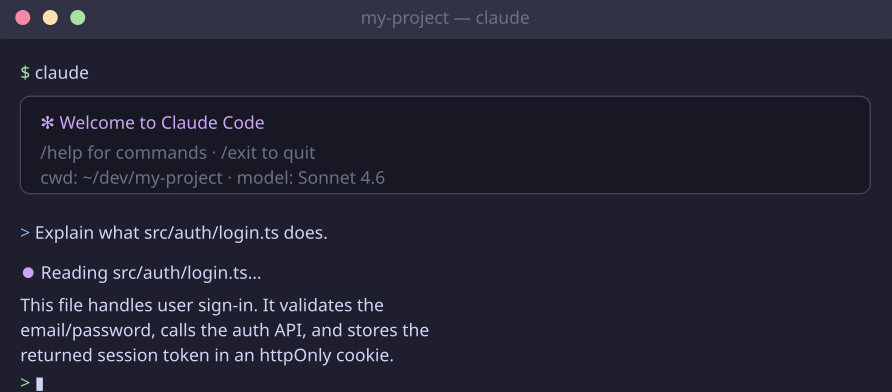
From here, you talk to it in plain English. You don't need to know commands, syntax, or special keywords. Just describe what you want:
"Explain what the file in src/auth/login.ts does."
"Add a search bar to the homepage component."
"Write unit tests for the getUserById function."
5. Essential commands to know
You don't need to memorize these — Claude Code mostly works through natural language. But a few slash commands are handy to know:
- /plan — Ask Claude to plan its approach before making any changes. It outlines every step and waits for your go-ahead. Great for complex tasks.
- /model — Switch between AI models mid-session. Use Sonnet 4.6 for everyday tasks (faster), Opus for complex refactoring or architecture decisions.
- /clear — Start a fresh context when the conversation gets too long. Keeps things snappy.
- /exit — Close the session.
Pro tip: Use Sonnet 4.6 for about 80% of tasks (it's faster and uses less quota). Only switch to Opus for truly complex, multi-file work.
6. The CLAUDE.md file: your project memory
Here's one of the most valuable things you can do as a beginner. Create a file called CLAUDE.md in your project's root folder.
Every time you start Claude Code in that folder, it reads this file automatically — so you never have to re-explain your project setup. Think of it as a welcome note for your AI coding partner.
A simple CLAUDE.md might look like this:
# My Project

## Stack
- TypeScript + React
- Node.js backend
- PostgreSQL database

## Run commands
- `npm run dev` — start local server
- `npm test` — run tests

## Coding preferences
- Always use async/await (not callbacks)
- Write tests for every new function
Even a five-line CLAUDE.md saves you from repeating yourself every session. It's worth creating before your very first real task.
7. Plan Mode: think before you build
When you're about to ask Claude to make a big change — refactoring a module, adding a new feature that touches many files, or working in an unfamiliar codebase — use Plan Mode first.
Type /plan before your request, and Claude will:
- Read the relevant files and trace dependencies
- Write out a step-by-step plan of every change it intends to make
- Show its reasoning so you can spot potential issues
- Wait for your approval before executing anything

This is especially useful for beginners — you get to review the "what" before Claude does the "how."
8. Beginner-friendly prompts to try
Not sure where to start? Here are real, copy-pasteable prompts that work well for beginners in their first week:
Read src/utils/date.ts and explain what this file does in simple terms.
Review the code in src/components/Button.tsx and tell me what could be improved.
Write unit tests for the calculateTotal function in src/cart.ts
Run git log --oneline -10 and give me a plain-English summary of what changed recently.
I'm getting this error: [paste your error here]. What's causing it and how do I fix it?
Create a simple REST API endpoint for user login using Express and TypeScript.
9. Common mistakes (and how to avoid them)
Don't skip Git. Claude Code has direct access to your files. Always work on a separate branch and commit your work before big tasks — if something goes wrong, you can roll back in seconds.
- Being too vague. "Fix my app" won't work well. Be specific: "The login button in LoginForm.tsx doesn't submit the form when clicked — fix it."
- Skipping CLAUDE.md. Without it, you'll repeat your project context every single session. Five minutes now saves hours later.
- Starting with something huge. Build up confidence first — ask Claude to explain code, write a test, or fix a small bug. Then tackle bigger things.
- Forgetting to review changes. Claude shows you a diff before applying changes — always read it. The AI is powerful, but you're still the decision-maker.
10. Tips to get more out of Claude Code
- Use /clear regularly. Long conversations get slower as context builds up. Starting fresh keeps responses fast and accurate.
- Give context in your prompts. Instead of "fix the bug," say "the getUserById function in src/api/users.ts throws an error when the user doesn't exist — handle this gracefully."
- Start with understanding, not building. Ask Claude to explain code you don't understand first. It's one of its best uses and builds your own skills in the process.
- Let Claude write tests. Testing is often the most tedious part of coding. Claude is excellent at this — hand it off from day one.
- Watch your quota. The Pro plan quota resets every 5 hours. Heavy Claude.ai usage in the morning will reduce your Claude Code quota in the afternoon — plan accordingly.
You're ready to start. Open a terminal, type claude, and ask it to explain something in your project. That's all it takes. Happy building!